|
|
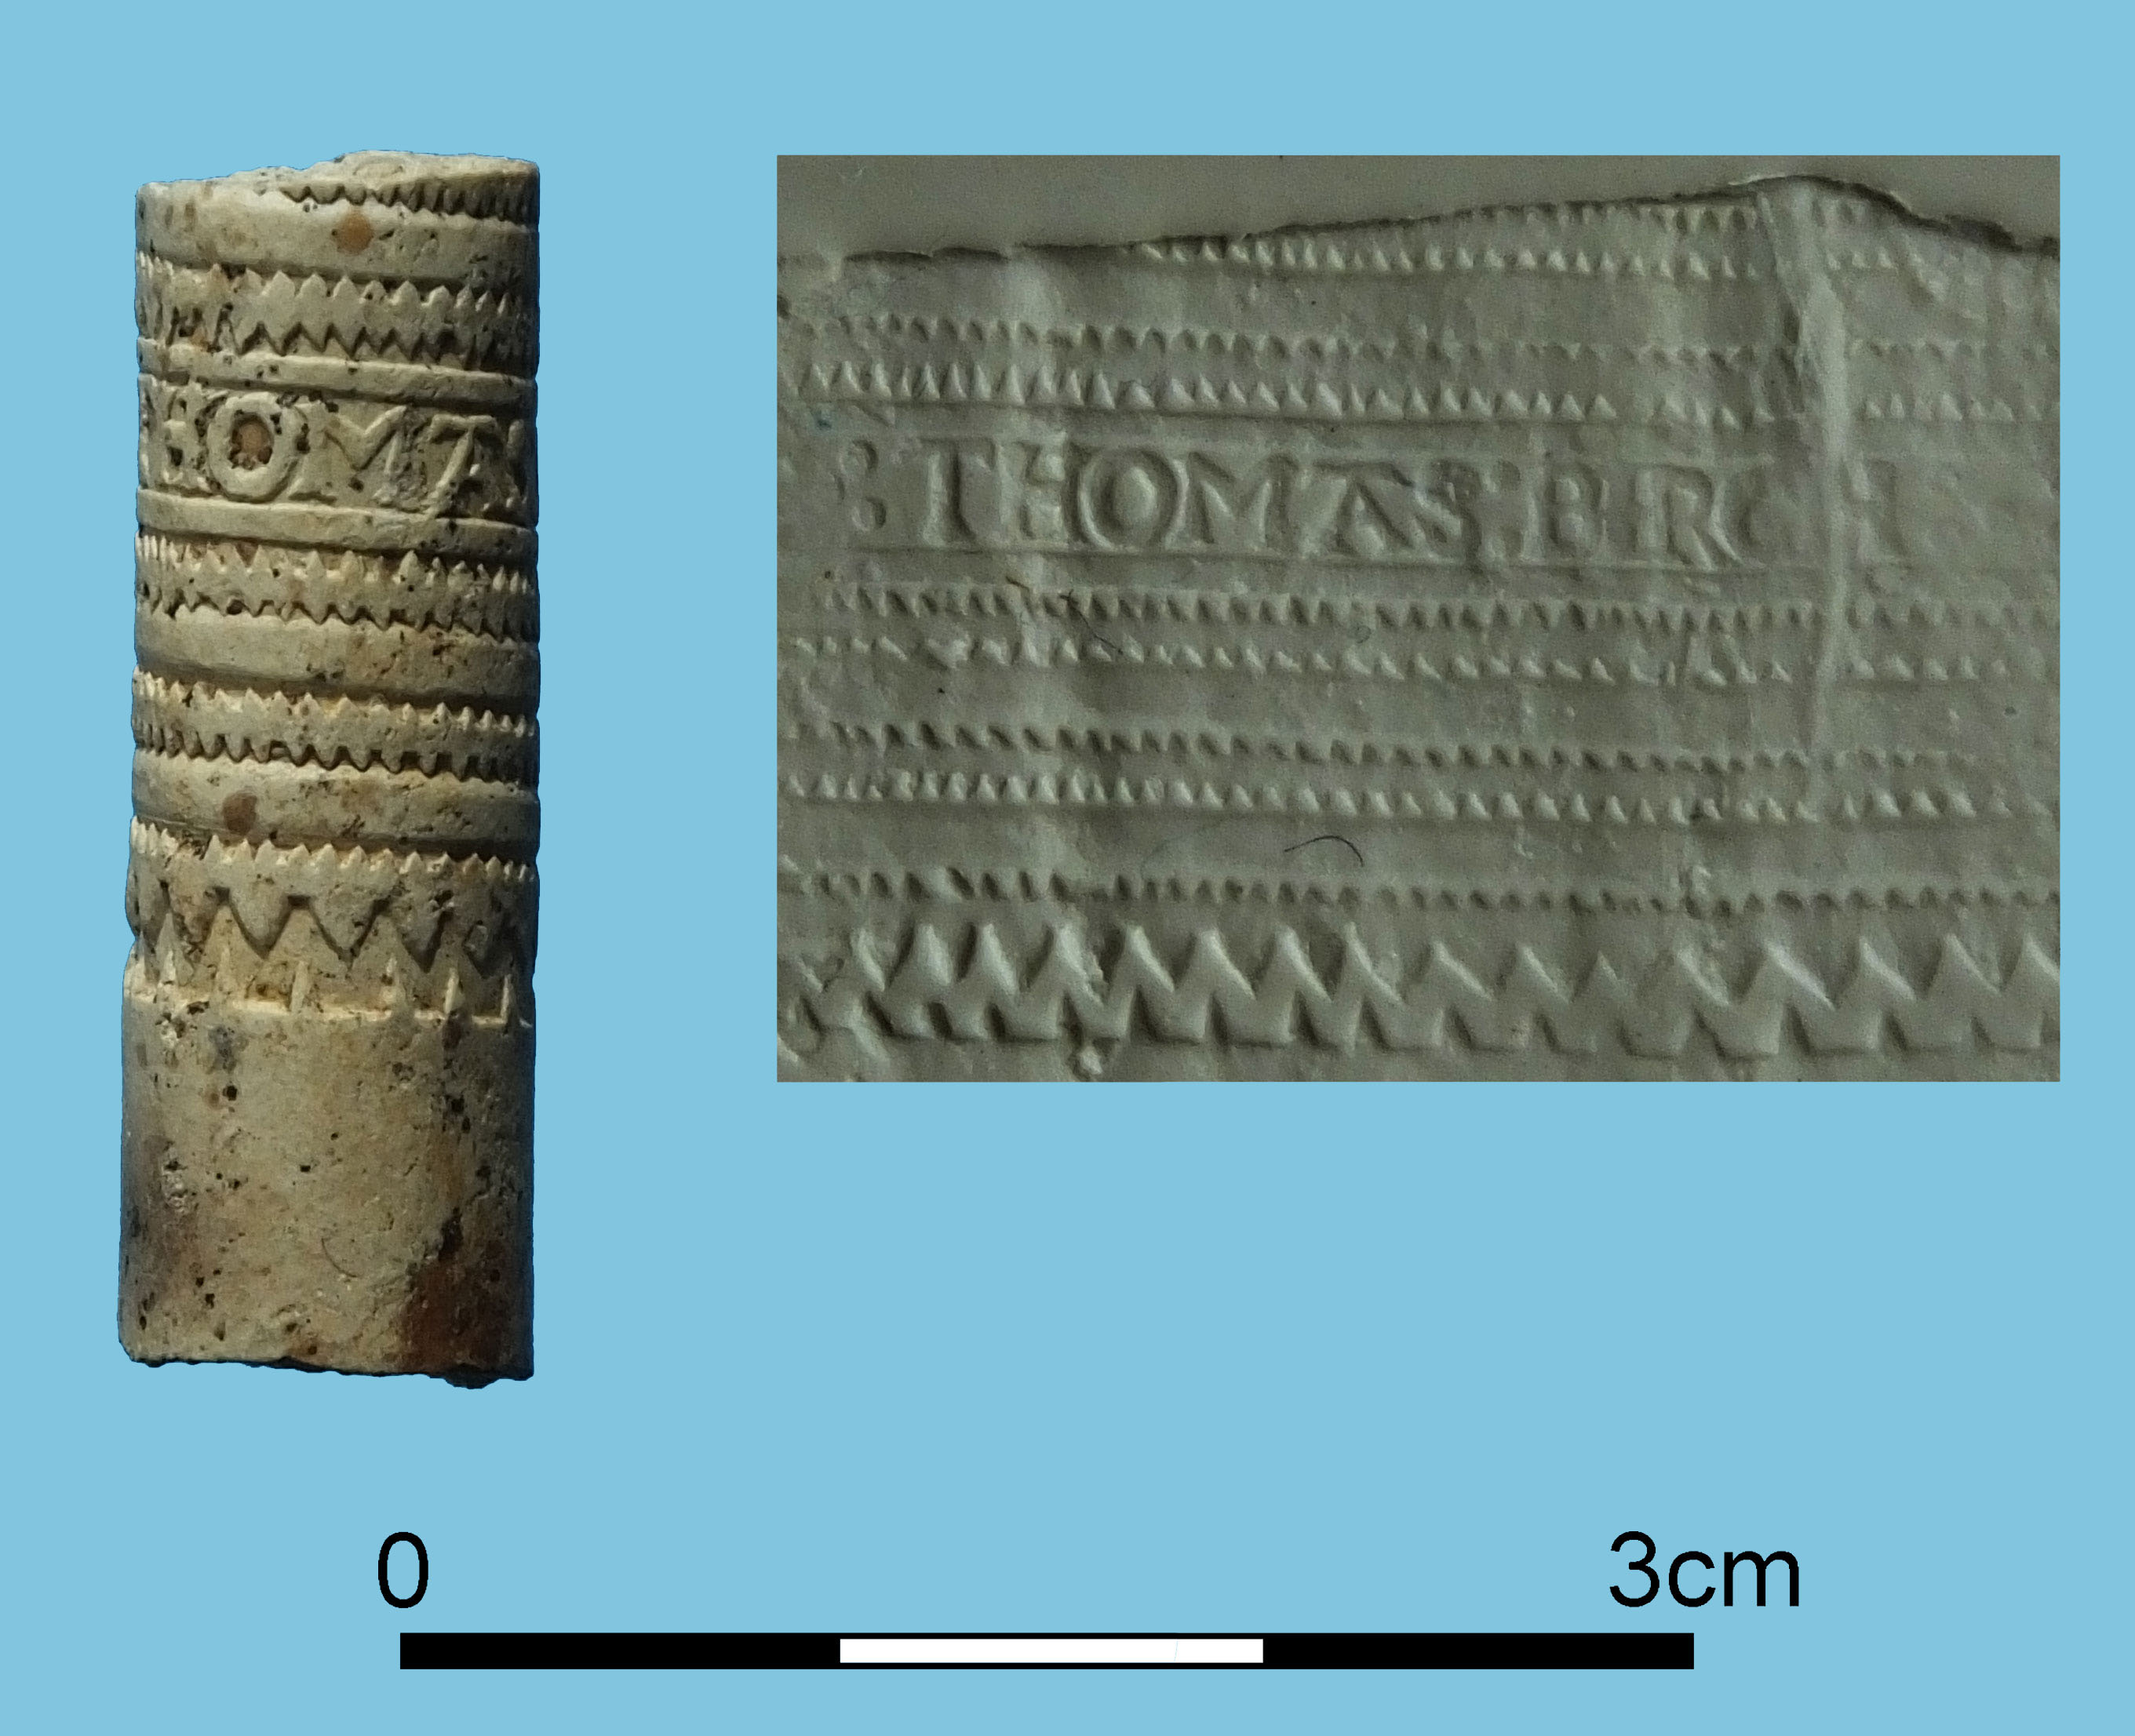
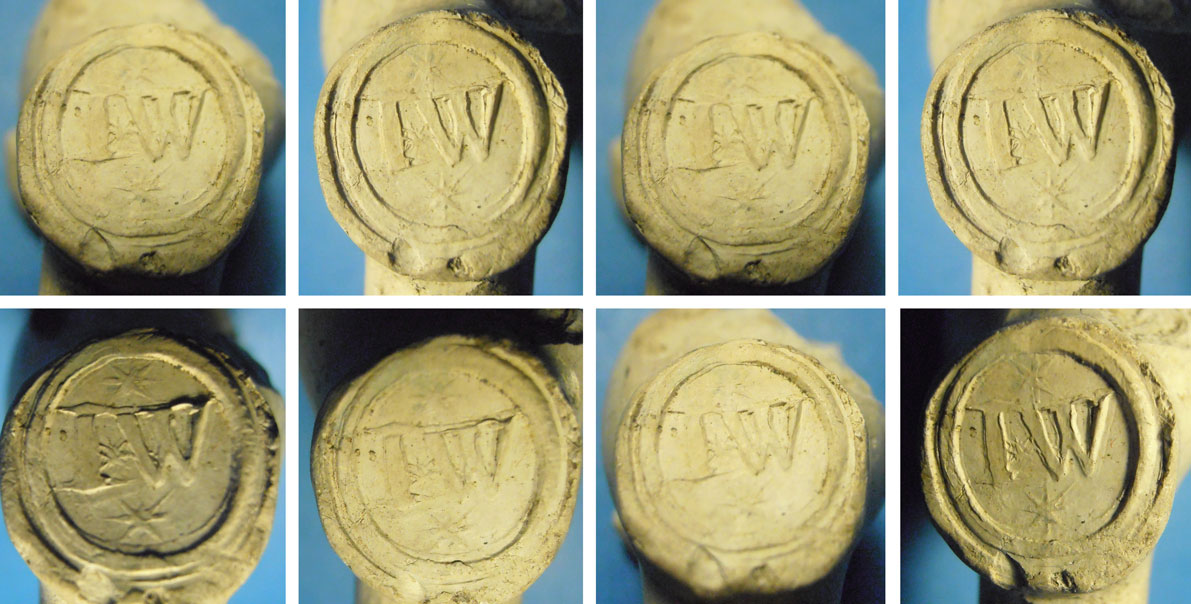
How to ... illustrate pipesPipe illustrations usually form an integral part of any of report or study and are perhaps the most easily assessable and frequently used part of any publication. Given their importance, thought should be taken in selecting the material to illustrate and with regard to which views or details will be required. Previously published drawings provide a valuable first reference point for any new study and should be consulted when selecting new material to illustrate. Previously unpublished bowl forms, marks and decoration should all be illustrated, as should fragments that show technical details or highlight specific characteristics of the study group. Illustrations should always be prepared for publication at life size and accompanied by a catalogue giving details of the example depicted and its context and/or reference number, so that the actual object can easily be located again. Line Drawings Pipes have traditionally been illustrated using line drawings and this is still the preferred method amongst finds specialists because of the clarity of form and detail this technique offers. The normal convention is to depict the bowl in side profile, facing to the right of the page (unless there is a good reason for showing the other side) and with the stem aligned horizontally. Both sides are only illustrated where there is a different decorative scheme on either side of the bowl. The plan of the heel or spur is projected below and should show whether the mould line survives or has been trimmed off. Any internal bowl markings are shown in plan as a separate detail, which is usually placed in front of the bowl and on the same orientation as the pipe itself. Where moulded marks occur on the sides of the heel or stem, those on the other (hidden) side are also shown as separate details. Likewise, any marks on the back of the bowl or top of the stem which will be foreshortened in the profile drawing are also shown as separate details. Moulded marks are normally just shown at life size, but stamped marks are usually also shown as a twice life size detail. When illustrating stamped marks, it can be very helpful to make an impression of the mark using modelling clay, particularly where the mark contains a lot of detail or is on a curved surface, such as a roll-stamped stem. A sheet of modelling clay (such as ‘plasticine’) needs to be rolled out and then talcum powder gently rubbed into the surface, to prevent adhesion to the pipe. The relevant part of the pipe can then be gently impressed into the modelling clay to create an accurate impression of the mark. If a pale (but not white) colour is used (‘stone’ works well) this can be placed on a normal scanner and the resulting image flipped (to create a ‘positive’) and enlarged as required to provide the basis for a detailed drawing (usually larger than twice life size, so it can be reduced for final publication). Photographs can be used in a similar way as impressions for most marks, but are not suitable for others, for example, the roll-stamped stems, where the mark occurs in a band all the way around the stem and an impression is by far the best option.
As with all archaeological drawings, the convention is that the light is falling from the top left of the illustration. This means that highlights and shadow can be shown on any marks or decoration to make them look more three dimensional and to show how they have been formed on the pipe. For makers’ marks, the convention is that incuse lettering or detail is shown in solid black and relief lettering or detail is outlined, with thicker lines used to indicate shadow. Stipple is not used to depict the curved surface of the pipe, which is taken as read, since it often interferes with any other marks or decoration that is being depicted. Small chips or cracks are also usually omitted for the same reason. Stippling can be used, however, to indicate flaked or broken areas where the original surface is missing, or to highlight unusual fabrics or finishes, such as red clay having been used for the body or a glazed area having been applied to the tip of a pipe.
Pipe drawings should always be prepared for reproduction at life size, since this enables direct comparison with other examples. Furthermore, the exact size of a bowl is often an important factor in determining its date, especially for examples dating from before c1730. Finally, details of the profile shape and any marks or decoration are difficult to see if a pipe bowl is reduced. The drawings themselves are often prepared in an enlarged form, which makes it easier to draw the fine detail, and then reduced for final publication. Pencil drawings can be prepared at life size from the pipes themselves and then enlarged to the required scale (usually 1.5 to 2 times) to prepare the finished artwork. A bar scale should always be included with the original pencil drawing and then copied as part of that image at each stage of the process right through to publication so that the size of the drawing can be checked at any point. The final publication drawings typically have a line weight of 0.25mm for the profile of the pipe and a line weight of 0.18mm for broken edges and any detail shown within the outline. These lines will need to be proportionately thicker where drawings are prepared at a larger scale. The final digital images should be prepared at 1200dpi and always have a bar scale in the final drawing. This is especially important in this digital age, where images can easily be unintentionally resized when they are being manipulated or copied. PhotographsPhotographs provide a quick and easy way of recording pipes and these can be very useful for record shots or as a visual index for archive collections. Many photographs, however, are poorly executed and could easily be improved with a little forethought. It is also important to remember the limitations of photographs over line drawings when choosing a medium for publication. When photographing a pipe, good lighting is essential together with a clean untextured background of contrasting colour. A strong, low angle light is often required to highlight surface detail, marks or decoration and this should preferably fall from the top left, unless a different orientation is required to highlight a specific detail. If necessary, a number of shots can be taken with different light angles to pick up detail. It is important not to have the camera too close to the pipe, which distorts the profile of the object. The camera should be placed as far away from the pipe as possible (so as to minimise this distortion), preferably on a stand, and with the subject filling the frame. There should also be a scale alongside the pipe and the pipe should be orientated square on to the camera, unless a specific detail is being photographed. A small piece of modelling clay is useful to place under a pipe being photographed. The pipe can be supported against or bedded into this so as to hold it in place and at the desired angle to the camera. It can also be very useful to support a glass sheet around 20cm above the background and to place the pipes and scale on this to be photographed. Any low angle light used to illuminate the pipe should then cast a shadow outside of the frame so that the subject can be photographed with a crisp, shadow free background. The side profile of a pipe bowl should always be photographed, since this is the outline that is required to compare with typologies for dating purposes. As with line drawings, the preferred orientation is with the bowl facing to the right, so as to show the surname initial of any moulded mark and make the illustration directly comparable with as many others as possible. Other views can then be taken as necessary to show any other marks, decoration, etc. In general, it is best to try and keep additional views square on (e.g., directly above, below or facing the seams of the bowl) unless the subject dictates otherwise. Details of marks are also useful. The camera should always be set to take a high resolution image so that the photograph can be enlarged to see detail if required and so that it is of a suitable quality to use for publication purposes. As a rule of thumb, images with a file size of around 5MB or more will produce good quality results and these should preferably be stored as in an archivally stable file format, such as .tif (.jpg images are unstable and loose quality over time with use). Thought should also be given to making sure photos are properly labelled so that they can be archived properly and securely backed up in a system that allows for their long-term preservation. Ideally each image should be renamed with details of the subject, or placed in a clearly labelled folder (and preferably both). A useful tip is to write details of the subject (site name and code; context or accession number; photographer; date) on a piece of paper and to photograph this alongside each pipe first, followed by more detailed photos of the object itself. This ensures that the subject is clearly identified in a batch of photos, even if the individual images have not been subsequently relabelled. The drawback with photographs, particularly for publication, is that it is often difficult to pick up all the detail on a pipe from any one lighting position, especially for elaborately marked or decorate pieces. This is because it is hard to get well defined contrast, since the detail essentially comprises ‘white on white’ on a curved / cylindrical surface, which is hard to photograph. It may also be necessary to photograph a single pipe bowl from a number of different angles to show all the details that can be included in a single drawing, e.g., maker’s marks on the bowl or stem; heel plan; internal bowl marks and moulded maker’s marks on the sides of the heel.
These pages
|
How to......illustrate pipes
|
 |
 |