|
|
How to ... record and analyise pipesWhen pipe fragments have been collected, whether as part of a private collection or as part of an archaeological project, it is important to record where they have been found. Bags should be properly labelled with the find spot or site information and the individual fragments labelled using waterproof ink (see ‘excavating pipes’ for further guidance on labelling). Once the individual fragments have been labelled, the nature and detail of the subsequent recording and analysis will depend on the intrinsic significance of the finds and the aims and objectives of the post-excavation analysis. For some sites, a detailed catalogue itemising every fragment may be required, while for others a summary describing the key elements within each context will suffice. It is also possible that a combination of recording levels will be required, for example, a broad context summary for the site as a whole but with selected classes of pipe (e.g., marked or decorated) or specific contexts (e.g., pit groups or kiln dumps) being subjected to more detailed recording and analysis. Even if a full catalogue of all fragments from a site is prepared, then a context summary is usually prepared as well (see ‘context summary’). Whatever the scope and purpose of the recording it is important that common standards are adopted for the terminology employed and the data collected so as to provide an unambiguous record of what has been found and to allow easy comparison with other assemblages. It is also important to ensure that a well ordered archive is produced that explains exactly what work has been done, what methodologies or codes have been used in compiling the report and ensuring that the supporting notes and documentation carry through to become part of the project archive, deposited with a suitable body for long-term curation. Recording guidelines for pipes from archaeological assemblages have been developed and can be used as the basis for any recording project (Higgins & Davey 2004). It is also possible to download a pro forma Excel table that can easily be edited so as to tailor it for a particular site or assemblage from the Society for Clay Pipe Research website (http://scpr.co/Recording_form.html). A glossary of pipe related terms is also available (see ‘Pipe Glossary’), as well as some further explanation and general guidance, which is given in the following sections. Counting Pipes The most basic record of what has been collected comprises a count of the fragments present. This is most usefully divided into bowl, stem and mouthpiece fragments since this gives an indication of the range of material present as well how reliable any dating derived from it may be (bowl fragments being generally much more accurately datable than any other part). Since the bowl merges into the stem, a judgement has to be made as to how to count any fragment that spans this bowl/stem junction. To do this, any fragment that includes any part of the base of the heel or spur, or any part of the interior of the bowl cavity, is included in the count of bowl fragments, regardless of how much stem is still attached to it. This is because if either of these areas survive, then it is likely that a reasonable assessment of the bowl’s form and date can be made. If a stem is just opening into a bowl, but does not actually include any of the bowl interior or any of the base of the heel or spur, then it is simply counted as a stem fragment. A fragment is counted as a mouthpiece where it has any part of the mouthpiece surviving, regardless of how much stem is attached to it. It is important to note that most mouthpieces were simply formed by a knife cut to the end of the stem. This means that both ends of any stem fragments must be checked for a cut rather than a fractured end. For larger assemblages, the easiest way to do this is to bundle the stems together between thumb and forefinger, square them on a flat surface and then check for cut ends. The bundle can then be carefully held together, flipped over and squared again, and the other ends checked. When giving any quantification for the pipes recovered it is important to note any collection or sampling policy that might have affected the numbers recovered, e.g., only one transect every 10m was field-walked, or only 50% of a ditch fill was excavated. Similarly, sieved deposits that will have resulted in a higher fragment recovery rate should be noted.
Having counted the fragments in any group, a useful shorthand way of expressing the figures for any summary description is to is to list the numbers of bowl, stem and mouthpiece fragments present (in that order), followed by the total. Thus “Context 001 (9/59/1 = 69) . . . ” indicates that Context 001 contains 9 bowl, 59 stem and 1 mouthpiece making a total of 69 fragments in total. Another way of quantifying the pipes is to arrive at a minimum number represented in any given group, as is often done for pottery. Pipe bowls are frequently broken into fragments, making them tricky to convert into ‘whole pipe equivalents’, and mouthpieces are usually underrepresented in excavations because they were often fragile and are frequently reduced to tiny fragments that are not recovered. The most useful part to count is therefore the bowl/stem junction, which is generally the most robust part of the pipe and only occurs once in each example. So, if the part of the bowl/stem junction where the heel/spur is or was attached survives (or the equivalent section for a spurless bowl form), then it can be counted as ‘1’ towards a minimum number total. Occasionally this can lead to an anomalous situation where the minimum number count is ‘0’, even though other pipe parts (including ‘body sherds’ from bowls) are present. This makes the technique most useful for very large assemblages where working out a figure by any other method would be difficult and time consuming. For small groups a ‘common sense’ approach is often the most useful, where the bowl fragments can simply be sorted into the minimum possible number according to their attributes (form, finish, fabric, stem bore, decoration, etc.). The method used should be clearly stated in any report or site archive and it should be applied consistently to all the groups from that particular site, so as to make the data comparable. Fabric The fabric of which a pipe is made can help in characterising it and determining its origin, but it can be very difficult to accurately categorise individual fabric types without scientific analysis because they all appear so similar in the hand. The main distinction to be made is between the fine ball clay (alias pipe clay) obtained from just a limited number of sites in Britain and anything else. Ball clays were used in many places from the earliest days of pipe production but pipes dating from before about the middle of the eighteenth century were also made from local clay sources if these were available. After that date improved transport networks meant that almost all pipes were made of ball clays, regardless of where they were made.
The ball or pipe clays used for pipe production were obtained from the south or south-west, most notably the Poole Harbour area of Dorset (Wareham Basin) and the Bovey Tracey / Newton Abbot area of Devon (Bovey Basin). The clays from these areas are very fine and without any notable inclusions, even when examined with a hand lens. It is important to note that these are known as ‘pipe clays’ or ‘ball clays’, which are white firing sedimentary clays as opposed to the ‘china clays’ that are used in other branches of ceramic production and come from different deposits. Both ball clay and china clay contain high proportions of the mineral kaolinite, but it is misleading to describe white clay pipes as ‘kaolin pipes’ since kaolinite by itself is unsuitable for pipe production. This distinction is made because American literature often refers to white pipes as ‘kaolin pipes’, which perpetuates this misconception. In broad terms, any pipe with a fine almost inclusion free white fabric can be regarded as being made of ball clay that had been ‘imported’ to the place of manufacture by the pipemaker. In contrast, ‘local’ fabrics that have been sourced elsewhere can often be distinguished by a slightly off-white colour and/or the presence of fine inclusions. In particular, white firing clays from the Coal Measures are typically distinguished by small opaque white angular inclusions in the fabric. These clays were not traded far, but were extensively used for early pipe production in areas where these deposits occurred near the surface, most notably in Shropshire, Lancashire and South Yorkshire. A local clay source is also evident in the Thames Valley area, particularly in the Oxford/Reading region, where fine sandy inclusions (rounded quartz grains) are characteristic of the earlier pipe products. Where local fabrics can be identified in an assemblage, the pipes made of these should be identified and a note made of the characteristics that distinguish them from the pipes made of ‘imported’ (i.e., Devon/Dorset type) clay. Stem Bores Stem bores are not normally recorded for all fragments unless a specific question is being addressed, for example, to characterise a closely dated group or type of pipe. It is useful, however, to record the stem bore of marked and decorated bowl fragments, or any illustrated pieces, so as to make the data on them as widely comparable with other examples as possible. Where stem bores are recorded, they should be measured in 64ths of an inch. The use of stem bores for dating deposits is not recommended (see ‘Dating Pipes’ for more information on this, and how to measure the bore). Burnishing Some pipes were finished with a burnished surface, which enhanced both their appearance and value, since it represented an extra finishing process. Burnishing is the compression and smoothing of the clay surface with a hard glossy object, such as polished steel or agate, while the clay is still in a leather hard state. The better the quality of the burnishing, the more the pipe was worth. This means that the presence/absence of burnishing and the quality of it can be used as a guide to the contemporary value of the pipe. It can also be used as a means for assessing the social status of a pipe or assemblage and in comparing one such group with another. For this reason, it is useful to not only record the presence/absence of burnishing, but also its quality, which can be expressed as one of four grades:
Burnishing on the stem is usually less well applied than that on the bowl and so is less reliable as an indicator of quality. Care must be taken with the identification of burnishing, especially where naturally glossy fabrics were being used. Burnished pipes exhibit the slight facets caused by the polishing and, usually, an alternating surface of glossy and matt strips. Burnished areas are indicated by a light broken lines following the burnishing strokes when the pipe is illustrated, with the spacing of the lines mirroring the quality (closeness) of the original burnish.
Where pipe fragments have been abraded or extensively weathered, for example by water rolling or repeated ploughing, or by high temperature burning, it may no longer be possible to tell if they were originally burnished. In old documents the term ‘glazed’ was used to describe a burnished pipe, and is not to be confused with the modern usage for a glassy surface coating. Tip or Mouthpiece Form The form and attributes of any tip or mouthpiece fragments are useful to record, since these can vary by period and/or pipe type. The most frequently encountered types are as follows: -
Tip or Mouthpiece Finish Fired pipeclay is very porous and will suck moisture into it when dry. This means that a pipe mouthpiece will stick to the smoker’s lips if it is not either made damp before use or coated with some sort of a finish to make it impermeable. Some of these finishes, such as milk or wax, are biodegradable and so do not usually leave any visible trace on the pipe, although they may be discernible from residue analysis (a field of study that has yet to be explored).
Care should be taken when washing mouthpieces, especially from contexts with good preservation, so that any faint traces of organic coatings are not inadvertently lost. Other types of finish, such as glaze, survive well in the ground and are readily identifiable. The evolution of tip finish over time and in different parts of the country has not been much studied and would repay further work. Where tip coatings are present a note of them should be made. Codes can be useful if data is collected in tabular form, the following types being the most commonly encountered: -
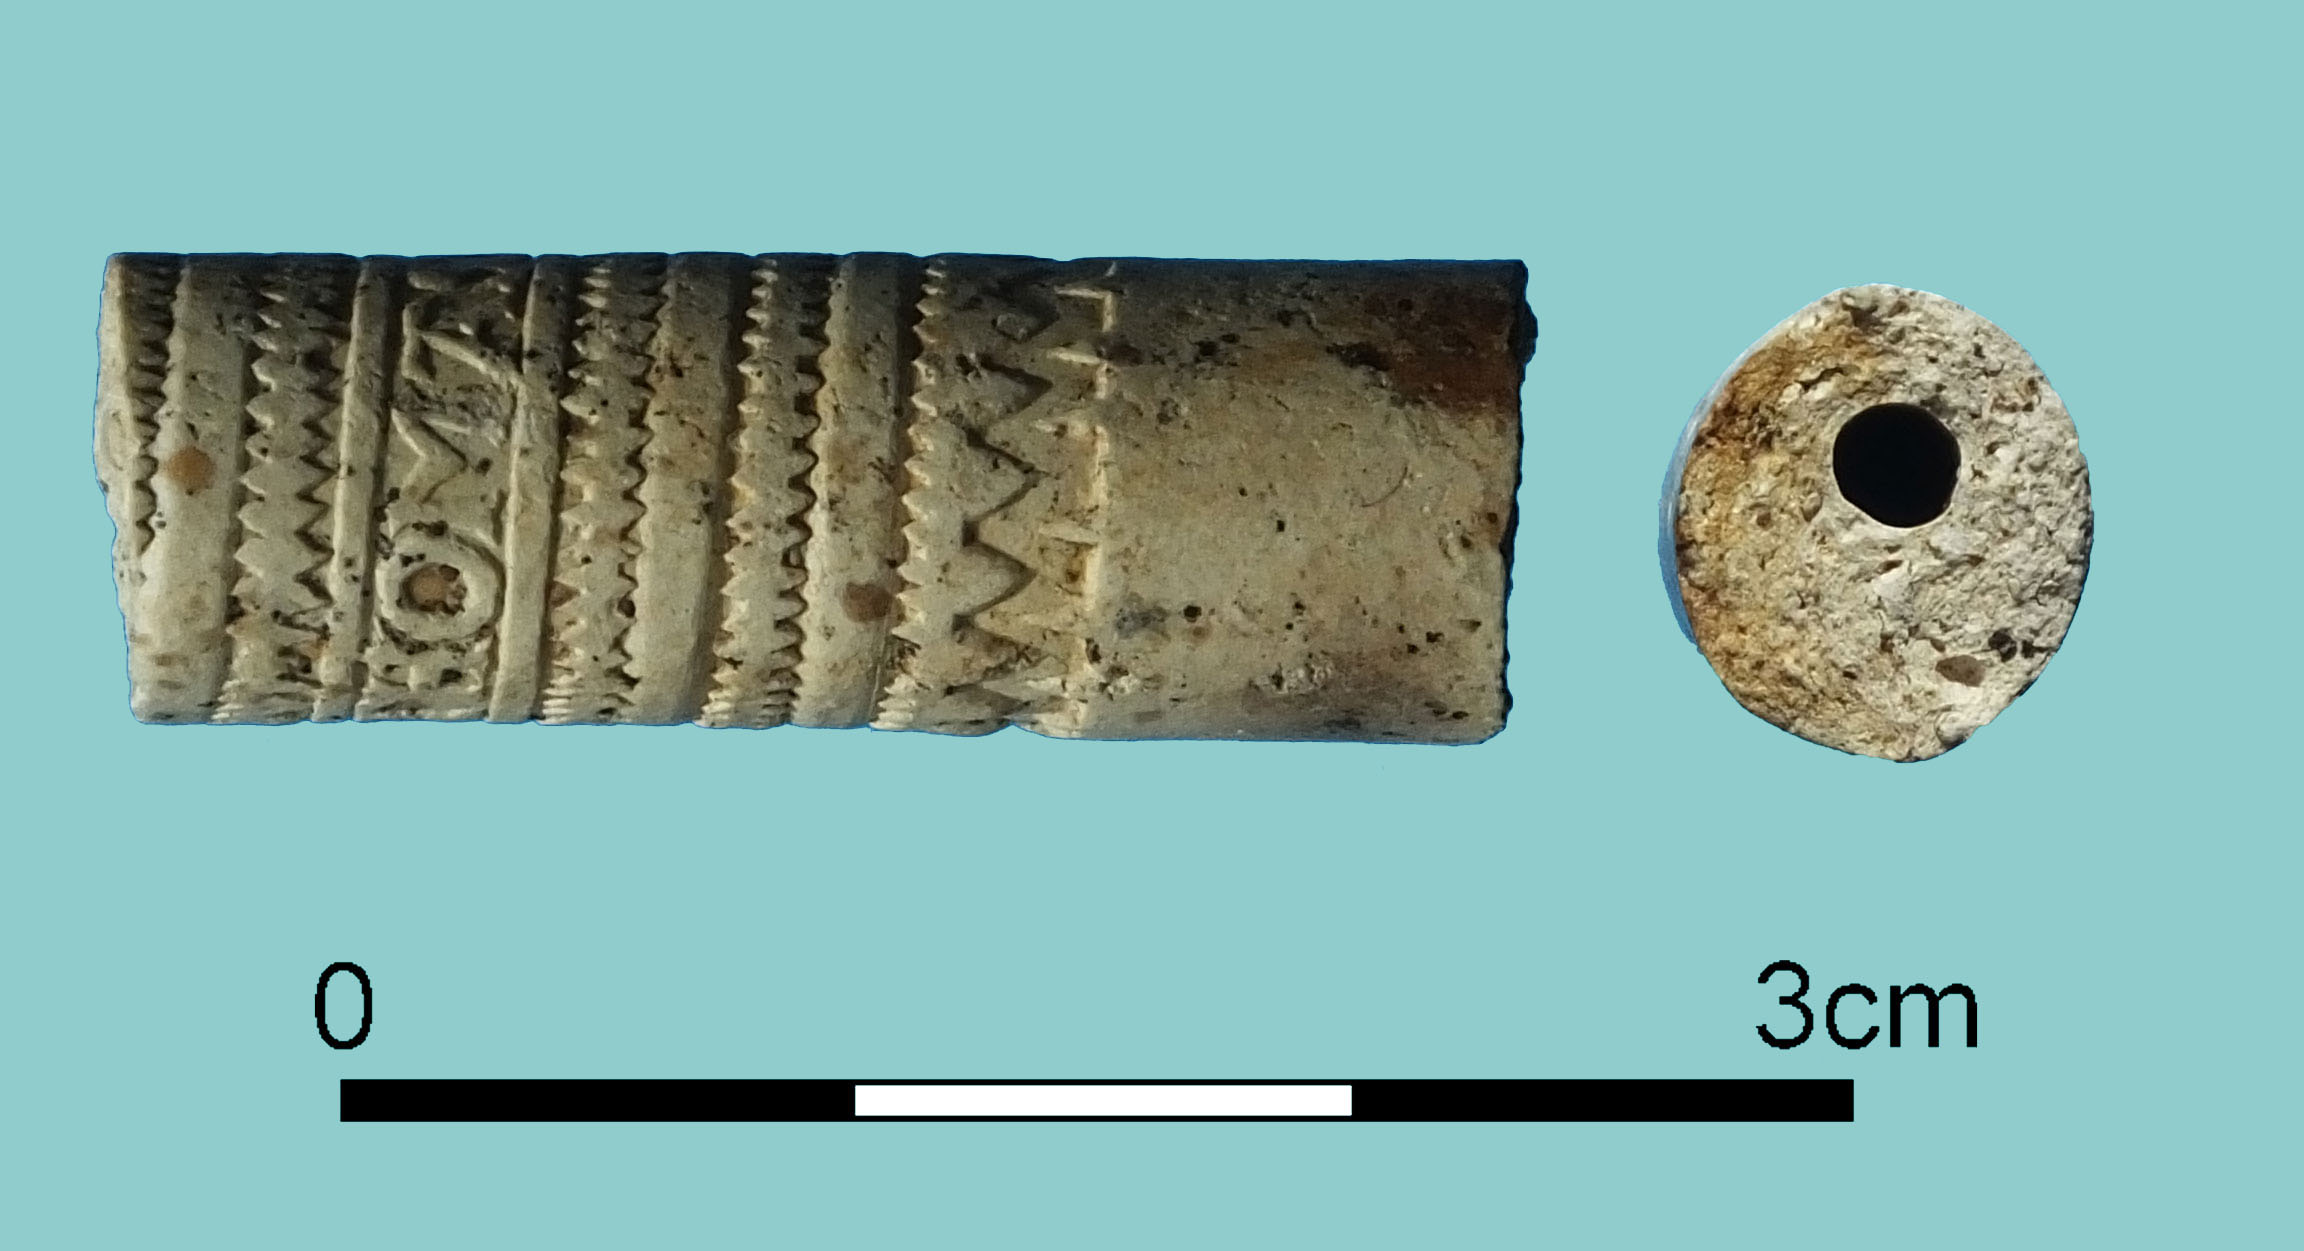
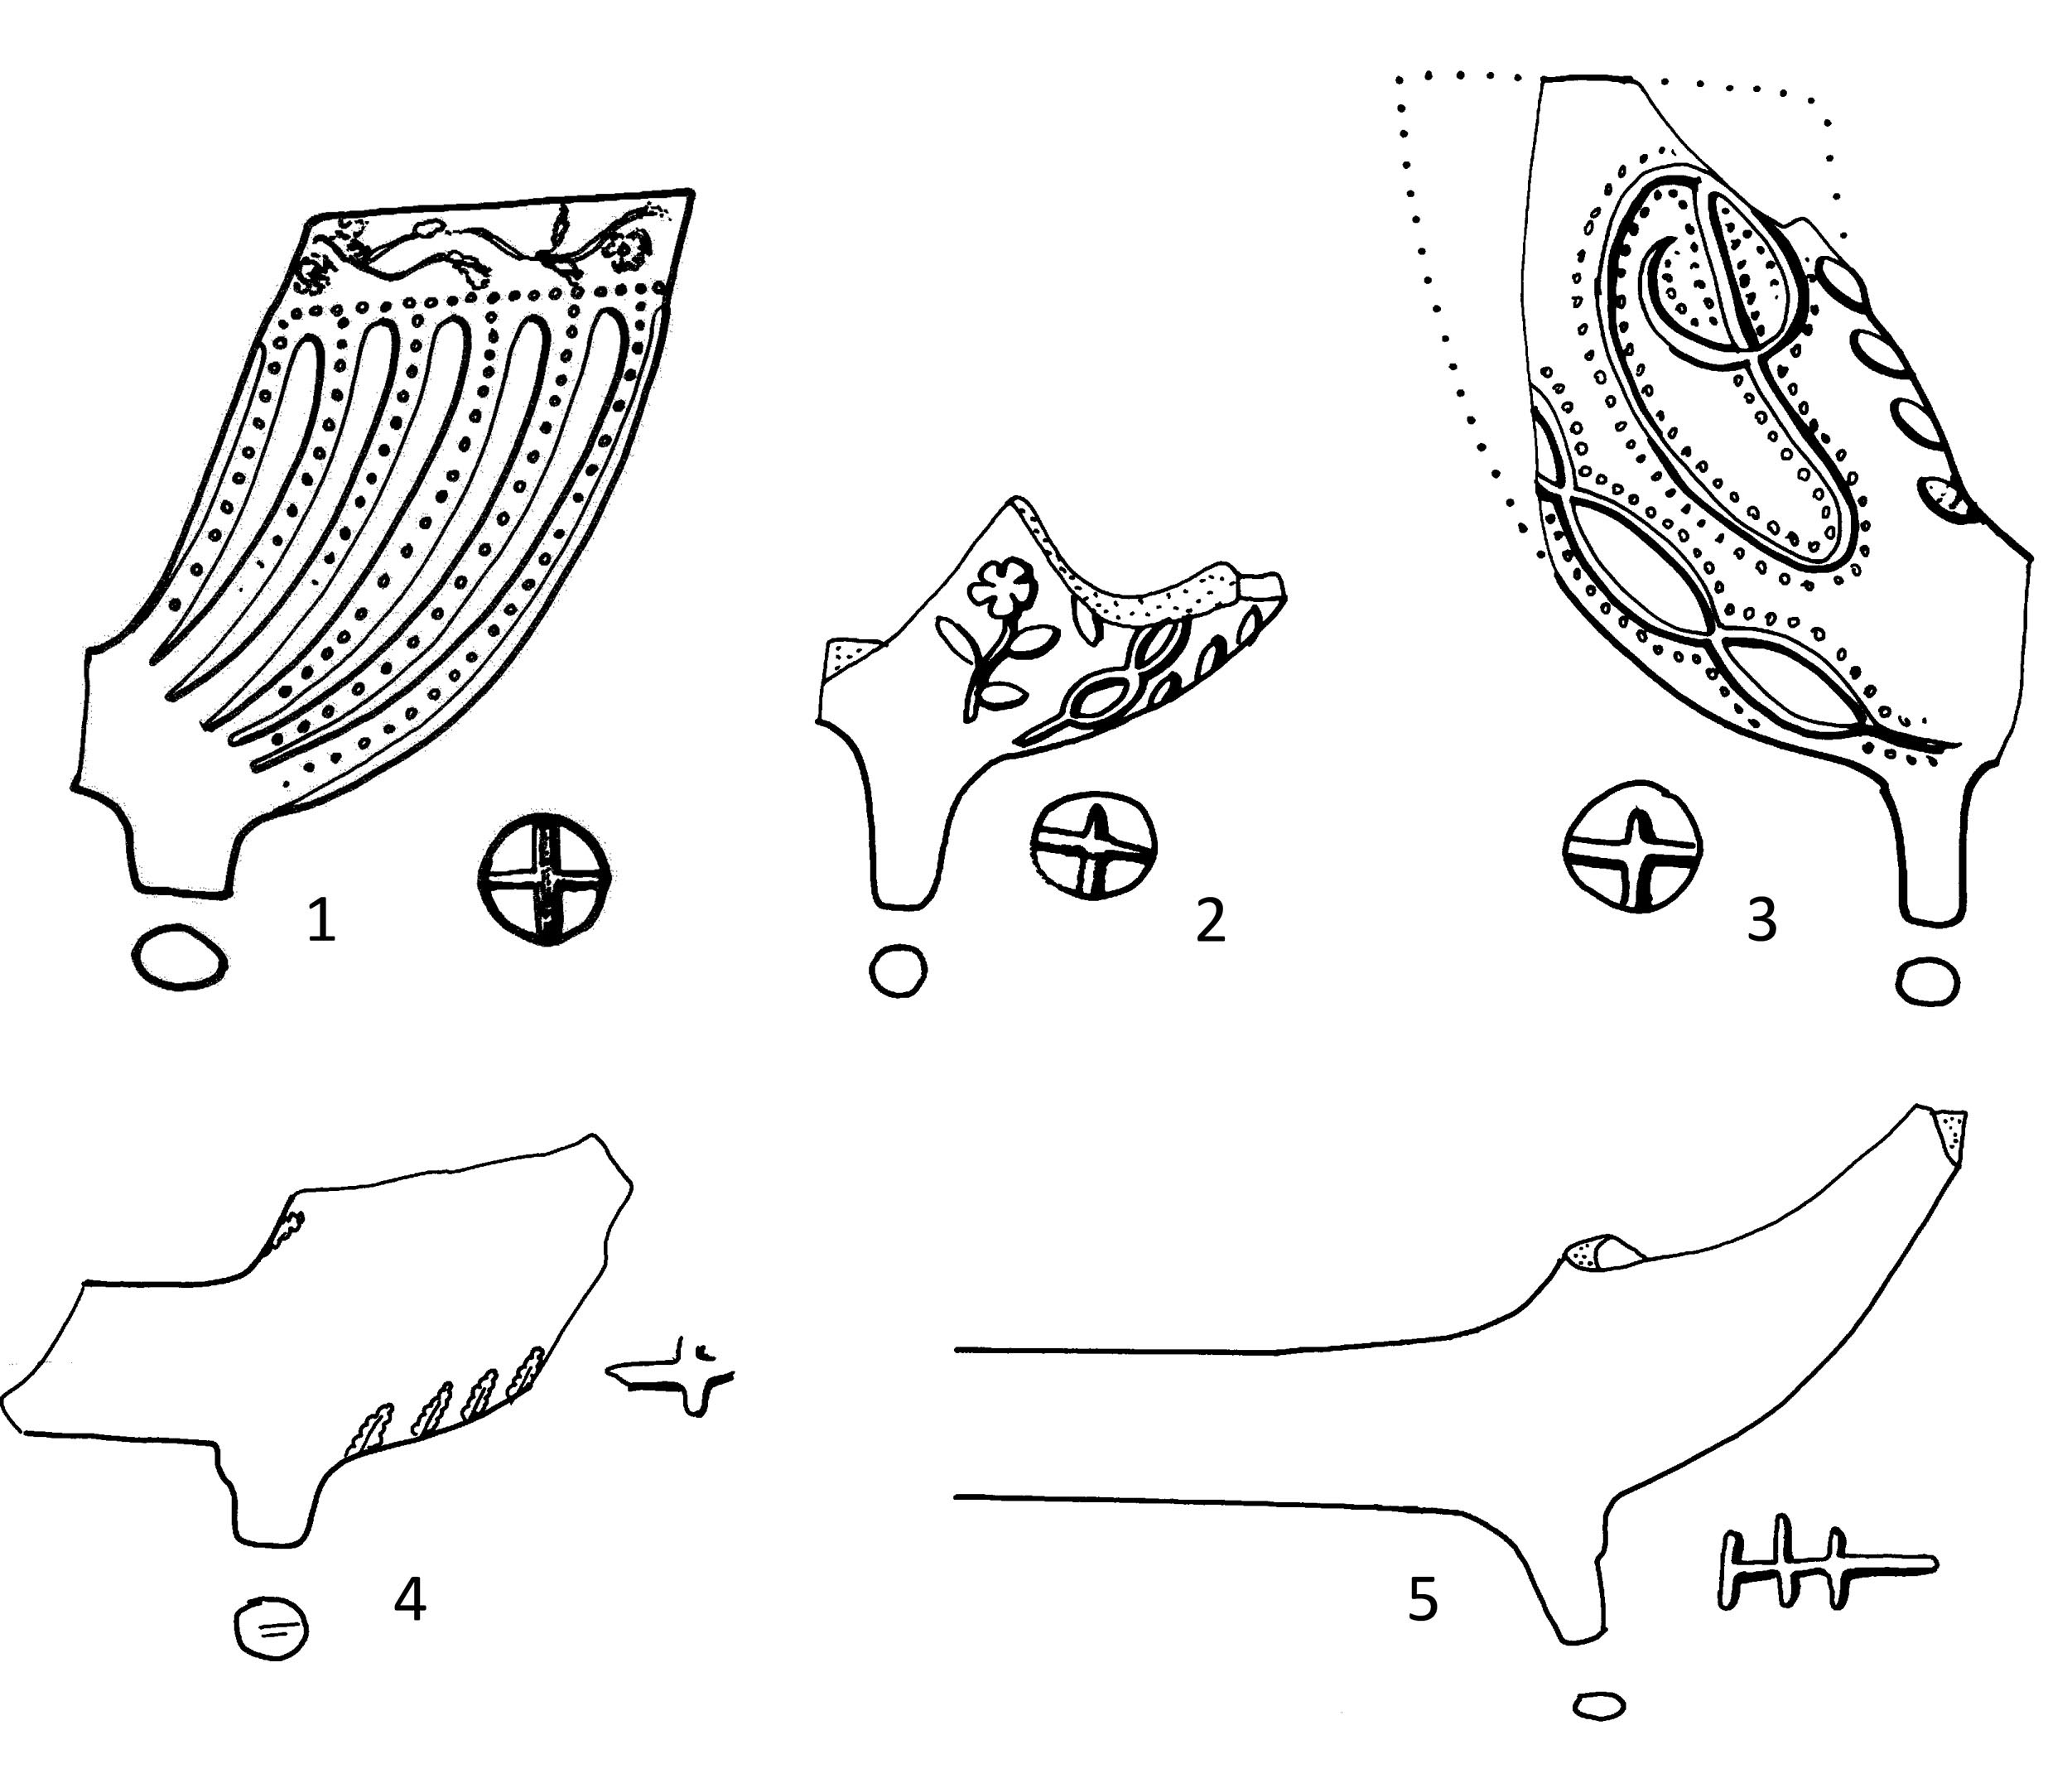
Internal Bowl Crosses (or Other Marks) Relief moulded marks are occasionally found on the base of the bowl interior. These marks were formed by designs cut into the end of the metal stopper that formed the bowl cavity during the moulding process and are not to be confused with scrape marks that may be formed across the base of the bowl interior by the moulding or trimming wires. These marks have not been noted on seventeenth century pipes, which generally had very narrow rather rounded bases to the bowl interior, but occur across Britain from the early eighteenth century onwards. The most common marks found on the internal base of a bowl are simple crosses. When viewed with the stem pointing directly towards the viewer these can either appear as '+' or 'x'. These symbols should be used in any catalogue or report to indicate which type is present. If some other symbol or letter is found it should be described. Occasionally multi-arm stars are found and, very rarely, initials have been observed. The function of these marks is unclear, but they may well have started as a precursor to the practice of ‘roughing up’ the end of the stopper to help prevent it sticking to the clay during moulding and sucking in the sides of the pipe as it is withdrawn.
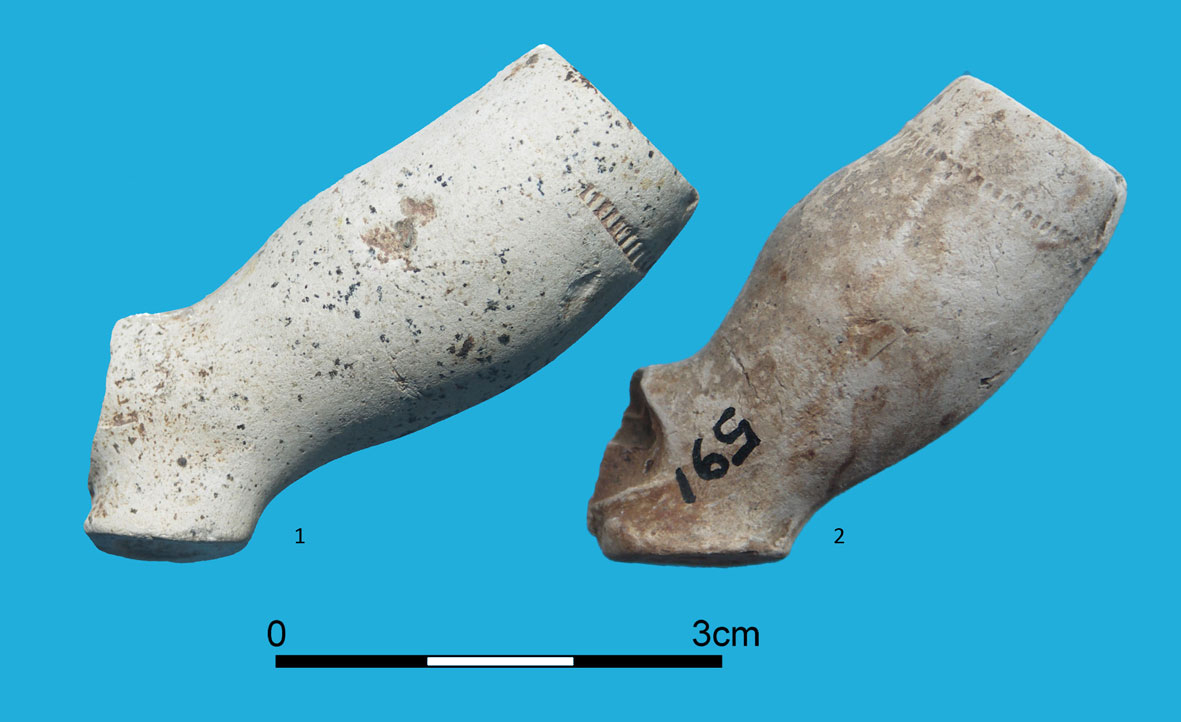
Rim Milling Rim milling was applied to almost all pipes produced from around 1600 through to the early eighteenth century, with some revival in the nineteenth century, particularly on Irish pipes. This decorative band was hand applied to the pipe during the finishing process using a serrated blade and is not to be confused with moulded milling, which was formed in the mould (and only occurs from the second half of the nineteenth century onwards). The amount of milling and the way in which it was applied are both indicators of the care that was taken in finishing a pipe and so, by extension, its quality. A pipe with a neatly applied band that joins up seamlessly is likely to be of a better quality than one with only a partial band, or one where the milling runs away from the rim at an angle. For this reason, it is normal to not only record the presence/absence of rim milling, but also the amount present. The amount of milling around the rim is estimated to the nearest quarter of a complete circumference and then expressed as a number ranging from 0 for no milling to 4 (four quarters) for a fully milled pipe. Only complete rims should be graded in this way, since the data can then be used to work out the average amount of milling in any given group, which makes it easily comparable with others. The numbers are simply added up and divided by the number of examples, to produce a ‘milling index’ (such as 3.16, which would denote that, on average, just over three quarters of all pipe rims in a particular group were milled). A note can also be made of incomplete rims where milling can be seen, but which are not complete enough to assess the original extent.
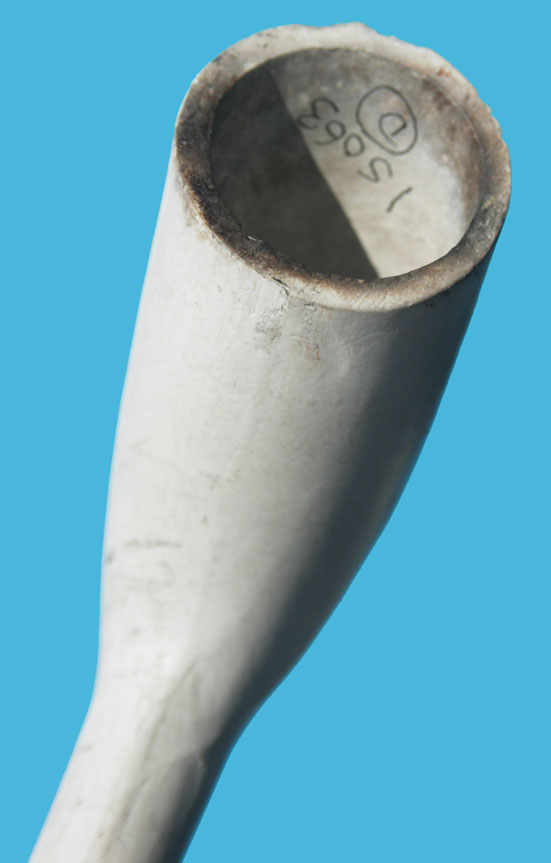
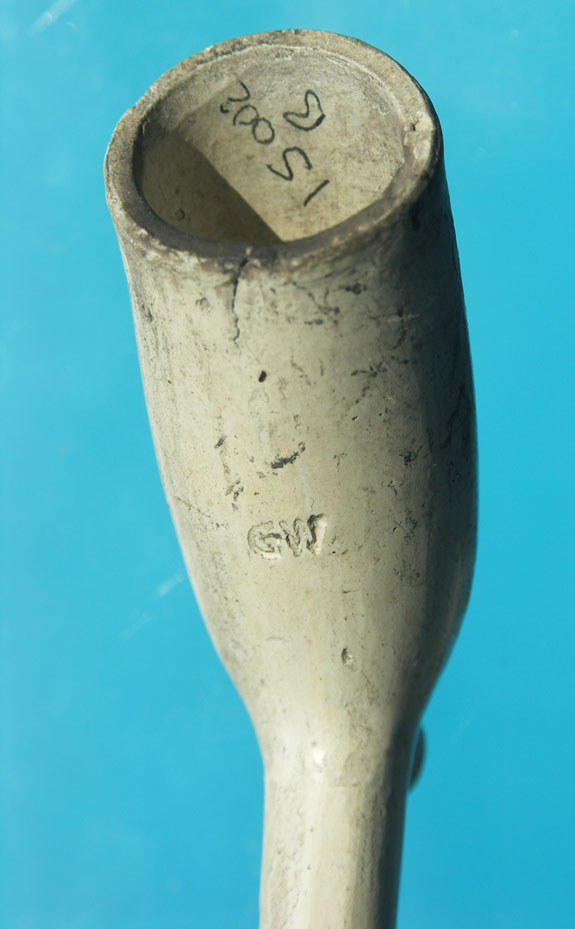
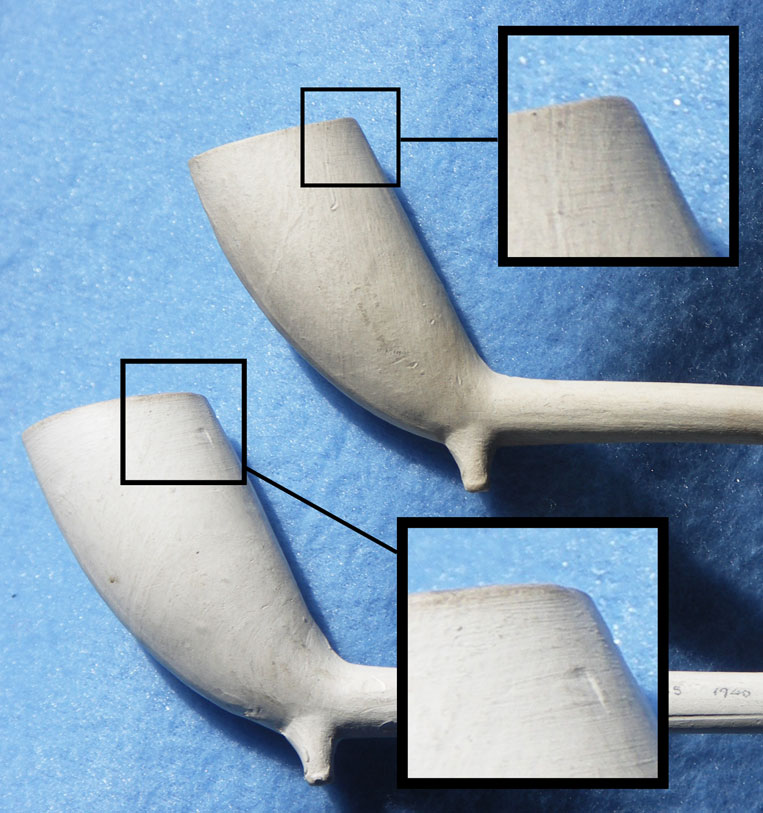
Rim Finish Once a pipe had been formed in a mould the rim could be finished in a number of different ways, which can, in turn, be used to help determine its date and quality. The most common types of finish, and the codes used to identify them, are as follows: -
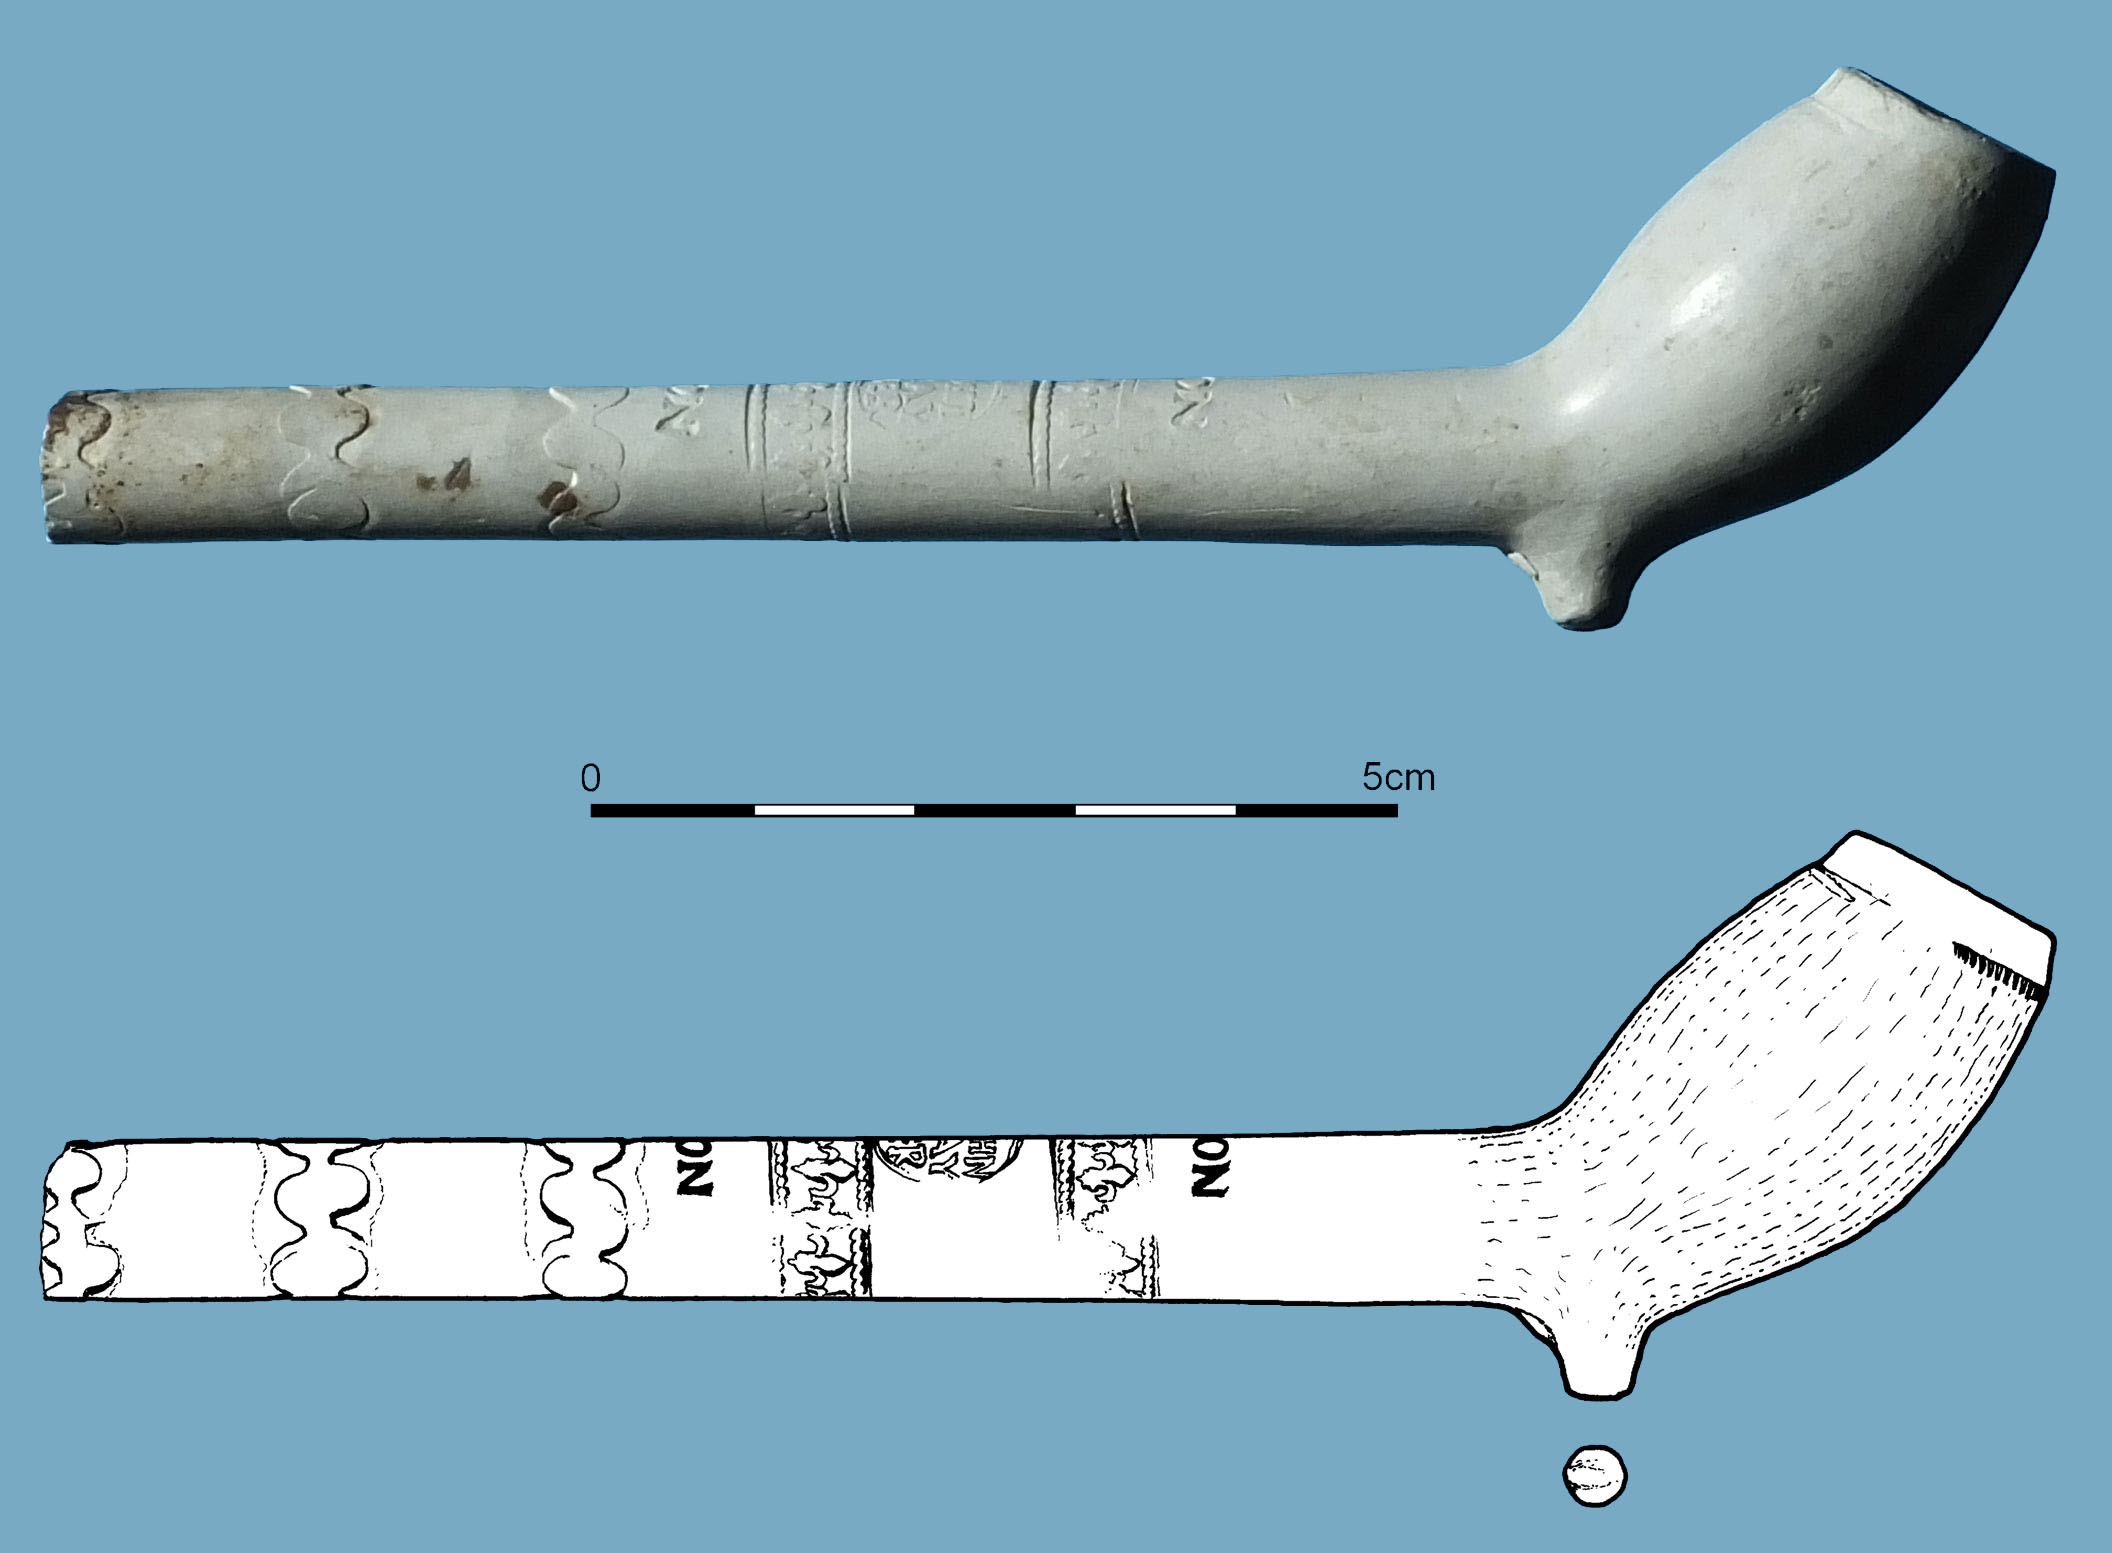
Sometimes these finishing techniques were used together and the codes can be used together to identify this finish in tables or notes. Thus, CW is a rim that has been cut and wiped or IB is a rim that had been internally knife cut and bottered. These last two techniques (internal trimming and bottering) can sometimes be difficult to distinguish where they occur together, since the bottering tool sometimes projected down inside the bowl and scraped the interior as it was rotated on the rim. As a general rule bottering produces a smooth, rounded and slightly polished appearance near the rim as opposed to knife trimming, which extends deeper into the bowl cavity and produces less even marks with a slightly uneven surface and drag lines where the blade has cut into the clay. Bowl Forms So far as possible, bowl forms should be identified and described with reference to previously published examples, especially when they come from well dated groups or form part of a local typology. Where new forms or decorative motifs are encountered these should be illustrated at life size, so as to provide a reference point for future work. Where good groups occur, for example kiln groups or pit groups, it may be possible to identify the specific moulds in which the pipes were made using ‘mould flaw analysis’. This entails recognising tiny flaws in the mould surface, often only clear with a 10x hand lens, that identify the products from a specific mould. Where individual moulds can be identified, they should be described and illustrated so as to define the forms and variability within the given assemblage. See the section on bowl forms in ‘dating pipes’ for more information on this topic.
Makers’ Marks When describing the makers’ marks found on pipes, it is very important to be clear about three things: where the mark occurs on the pipe; what form (style) the mark takes and how it was created. This is because all three factors are relevant to the date of the pipe and in which part of Britain it is likely to have been produced.
Context Summary For some assemblages a context summary is all that is required, and for most site groups one will be compiled, even if a full catalogue of pipe fragments has also been prepared. The purpose of the context summary is to bring together the key information about each context group of pipes from a site and to present it in tabular form so that the data is easily accessible, particularly for the excavator for whom dating evidence provided by the pipes may be crucial. The summary enables an overview of the pipes evidence to be readily viewed for the site itself as well as making this information comparable with other sites. An Excel or similar table is the best way of presenting this data so that it can also be searched and sorted to some extent. There are three principal aims for the context summary: -
In order to do this the recommended categories of information to be displayed (and the abbreviations used for column headings) are as follows: -
Back to How To... |
How to......record pipes
|
 |
 |